

How To Add Email Signature In Office 365

[Update]: This blog post was first published on July 7, 2016. It was updated to reverberate the changes introduced in the new Exchange admin center.
In this article, y'all can find out how to set up your own server-level automatic e-mail signature or disclaimer in Office 365. Like well-nigh of today'south electronic mail signature solutions, it supports HTML content such as tables, images and font formatting, merely in dissimilarity to e.g. Google Workspace (G Suite), information technology too allows for automatic personalization of individual signatures. Yet, there is no option to e.k. insert the signature directly below the latest reply/forrad, or preview it in the user'southward mailbox.
The following article describes how to fix up a global electronic mail signature in Role 365. If you adopt the video format to the text-and-screenshot-based one, go to this blog post instead.
How to gear up an email signature in Office 365
The steps below show how to gear up a global email signature in the Exchange admin centre (EAC).
- Log in to the Exchange admin center using an Exchange Online administrator business relationship.
- Go to Mail period > Rules.
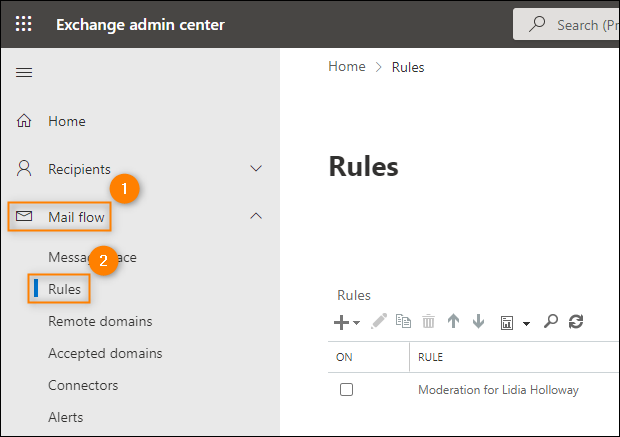
- Click theplus icon and selectEmploy disclaimers.
Annotation: When yous select theUtilize disclaimers action (instead of Create new rule…), thenew dominion window will open with the attributes already preselected.

- In the new rule window, type the name of your rule and configure the settings co-ordinate to your needs.
Note: If you want to use some additional settings (e.yard. exceptions, the option to prepend the disclaimer), click theMore options link at the bottom of the new dominion window.
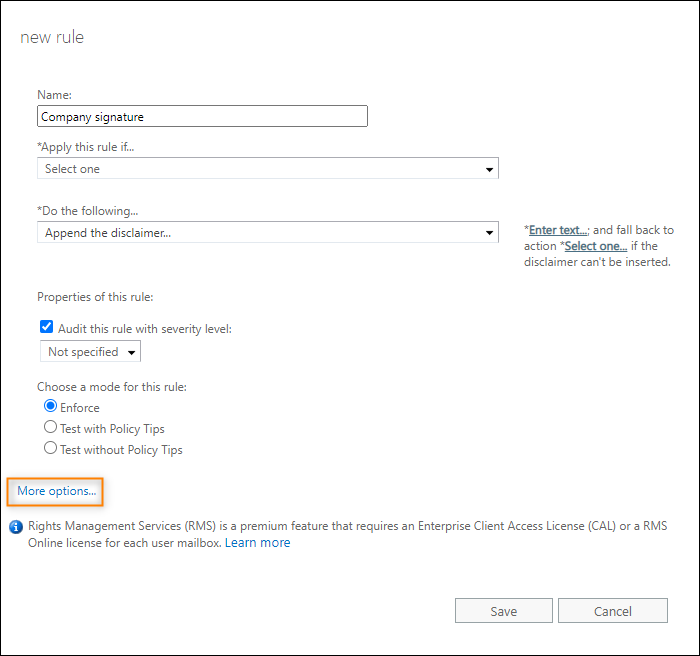
- In the Employ this rule if section, select the weather condition that will trigger the dominion. You tin can find the list of bachelor conditions in this Microsoft'south article.
- In the Do the following section, theAppend the disclaimer action should already be selected. If it is not, use the dropdown menu to select it.
- At present, you need to insert your signature into the Office 365 editor. The signature tin can be either obviously text or HTML lawmaking. To add your signature, click theEnter text link and add the text or HTML code of your organization-broad e-mail signature in the specify disclaimer text window.
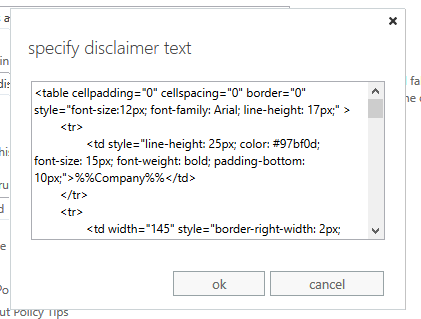
Note: To personalize email signatures for your Office 365 users, you can add Substitution belongings variables such as First proper noun, Final name, Phone number, etc. To add them to the signature, apply the %%PropertyName%% pattern, for example %%FirstName%%. Then, such placeholder volition exist automatically replaced with the proper value for the user. Y'all can find the complete listing of accepted properties in this article. - Next, select the preferred fallback activity, which will be executed in instance of problems with inserting the signature. Yous can select Wrap (forward the original message equally zipper and stamp the forward),Ignore (send the message without the signature) orDecline (don't send the message).
Tip: You don't take to exist an HTML expert to create a professionally looking email signature. Feel complimentary to use this email signature generator or download 1 of the templates available in our free email signature template library. Then, if needed edit it and then that all the variables follow the %%PropertyName%% pattern and paste the signature HTML lawmaking into Office 365 signature editor.
- Other rule properties utilise the default settings, which y'all tin can keep or arrange to your needs. For more data on these settings and the differences in dominion processing based on message type, go to this article.
- Click Save to save the rule.
- Send a test bulletin to check if the signature works as expected.
That'due south it! Your company-wide Office 365 email signature is ready to utilize.

Limitations of the native Office 365 solution
Unfortunately, there are several important functionalities you don't get when using the built-in Office 365 email signature solution. Those include:
- Inserting the signature directly under the latest e-mail reply or forward.
- Displaying server-side email signatures in the users' Sent Items folders.
- Displaying electronic mail signatures every bit you blazon an email.
- Letting the users decide which email signature to use.
- Delegating rights to manage e-mail signatures to non-admin users (for instance, to Marketing).
- Embedding images in e-mail signatures (not as attachments).
- Skipping signature lines which incorporate blank spaces when variables can't exist updated (e.g. because the value wasn't provided for a user).
To overcome those limitations and gain other capabilities, I recommend using a third-political party solution similar CodeTwo Electronic mail Signatures for Office 365.
You can as well watch this video to learn about the product highlights:
See also:
- Why manage signatures centrally in Microsoft 365, and what are the limitations?
- How to accept an Office 365 electronic mail signature inserted only into new emails?
- Problems with electronic mail signatures in Office 365

How To Add Email Signature In Office 365,
Source: https://www.mail-signatures.com/articles/configuring-organization-wide-email-signatures-in-office-365/
Posted by: kentunclefor.blogspot.com
0 Response to "How To Add Email Signature In Office 365"
Post a Comment